When it comes to indulgent and elegant desserts, Brazo de Reina (Queen’s Arm) is a beloved classic in Latin American cuisine. This rolled sponge cake, typically filled with dulce de leche or fruit preserves, is as visually stunning as it is delicious—a perfect centerpiece for celebrations, holiday feasts, or afternoon tea. However, traditional recipes often rely on high-carb ingredients like wheat flour, sugary fillings, and processed toppings, making them off-limits for those following a keto, low-carb, or gluten-free lifestyle. Enter Brazo de Reina , a delicious, low-carb version that swaps out high-carb ingredients for wholesome alternatives like almond flour, sugar-free sweeteners, and natural fillings. This cake is perfectly light, flavorful, and guilt-free—perfect for indulging without derailing your diet.
In this article, we’ll guide you through making this delightful Brazo de Reina step-by-step, explore its nutritional benefits, share creative variations, and explain why it’s become a favorite among health-conscious bakers. So grab your mixing bowl and let’s dive into this elegant, guilt-free creation!
Why Brazo de Reina Is a Must-Try
Perfect for Low-Carb and Keto Diets
By using almond flour, coconut flour, and sugar-free sweeteners, this recipe keeps the carb count low while delivering all the indulgence of classic Brazo de Reina. It’s ideal for anyone following a ketogenic, low-carb, or sugar-free lifestyle.
Light, Fluffy, and Elegant
The combination of a soft sponge cake, creamy filling, and delicate rolling technique creates a dessert that’s both satisfying and indulgent—a perfect balance of textures and flavors.
Quick and Easy to Make
This recipe requires just a few simple steps and minimal prep time, making it perfect for busy mornings, meal prep, or casual gatherings. Simply bake, roll, and serve!
Health Benefits of Brazo de Reina
Low in Carbs, High in Healthy Fats
Almond flour provides healthy fats and fiber, while sugar-free sweeteners ensure no blood sugar spikes. Adding eggs boosts protein and essential nutrients.
Packed with Nutrients
Eggs are rich in protein and vitamins, while almond flour adds vitamin E and magnesium. Using natural fillings like sugar-free dulce de leche or fruit preserves provides antioxidants and flavor without the carbs.
Gluten-Free and Grain-Free
Since this recipe skips wheat-based flours entirely, it’s naturally gluten-free and grain-free, making it suitable for those with dietary restrictions or sensitivities.
A Treat You Can Feel Good About
Using fresh, whole ingredients ensures this cake is free from refined sugars and processed additives, making it a healthier alternative to store-bought options.
Step-by-Step Guide to Making Brazo de Reina
Ingredients You’ll Need
For the Sponge Cake:
- 4 large eggs, separated
- 1/2 cup granulated sugar substitute (like erythritol or monk fruit)
- 1 teaspoon vanilla extract
- 1/2 cup almond flour
- 2 tablespoons coconut flour
- 1 teaspoon baking powder
- Pinch of salt
For the Filling:
- 1 cup sugar-free dulce de leche (or fruit preserves like strawberry or raspberry)
- Optional: Whipped cream sweetened with sugar substitute
For Dusting:
- Powdered sugar substitute (optional, for garnish)
Instructions
- Preheat the Oven :
- Preheat your oven to 350°F (175°C). Line a jelly roll pan (approximately 10×15 inches) with parchment paper, leaving an overhang on the sides for easy removal.
- Prepare the Sponge Cake Batter :
- In a mixing bowl, beat the egg yolks with half of the sugar substitute and vanilla extract until pale and creamy.
- In a separate bowl, whisk together the almond flour, coconut flour, baking powder, and salt. Gently fold this dry mixture into the egg yolk mixture until smooth.
- Whisk the Egg Whites :
- In a clean, dry bowl, beat the egg whites with a pinch of salt until soft peaks form. Gradually add the remaining sugar substitute and continue beating until stiff, glossy peaks form.
- Combine the Batter :
- Gently fold the beaten egg whites into the egg yolk mixture in three parts, being careful not to deflate the batter. The final batter should be light and airy.
- Bake the Sponge Cake :
- Pour the batter evenly into the prepared pan, spreading it gently to the edges.
- Bake for 10-12 minutes, or until the cake is golden brown and springs back when lightly touched.
- Roll the Cake :
- Immediately after removing the cake from the oven, dust the top with a light layer of powdered sugar substitute (optional).
- Carefully lift the cake with the parchment paper and roll it up tightly from one short end. Let it cool completely while rolled.
- Assemble the Brazo de Reina :
- Once the cake has cooled, gently unroll it and spread the sugar-free dulce de leche or fruit preserves evenly over the surface. Add a layer of whipped cream if desired.
- Carefully reroll the cake, using the parchment paper to help maintain its shape.
- Garnish and Serve :
- Dust the outside of the rolled cake with additional powdered sugar substitute, if desired.
- Slice and serve chilled or at room temperature. Store leftovers in an airtight container in the refrigerator for up to 3 days.
Creative Variations for Brazo de Reina
Chocolate Lovers’ Delight
Add cocoa powder to the sponge cake batter for a chocolatey twist, and fill with sugar-free chocolate ganache or hazelnut spread.
Berry Bliss
Use sugar-free berry compote as the filling for a fruity, tangy surprise.
Coconut Cream Dream
Fill the cake with a layer of sugar-free coconut cream and sprinkle shredded coconut on top for a tropical flair.
Nutty Crunch
Sprinkle crushed nuts (like almonds or pecans) over the filling for added texture and flavor.
Tips for Perfect Brazo de Reina
- Don’t Skip the Rolling : Rolling the cake while warm ensures it retains its flexibility and prevents cracking during assembly.
- Use Fresh Eggs : Fresh eggs provide the best structure and stability for the sponge cake. Separate the yolks and whites carefully to avoid deflating the batter.
- Customize the Sweetness : Adjust the amount of sugar substitute to suit your taste preferences, keeping in mind the sweetness of the filling.
- Store Properly : Keep leftovers in an airtight container in the refrigerator to maintain freshness. Freeze slices for up to 3 months and thaw in the refrigerator before serving.
Why Brazo de Reina Is Perfect for Every Occasion
Whether you’re hosting a holiday feast, packing lunches for work, or simply craving something sweet yet healthy, this cake is versatile enough to fit any setting. Its elegant presentation and bold flavors ensure it’s a hit at any gathering, while its low-carb profile makes it suitable for a variety of dietary needs.
For families, it’s a great way to introduce kids to healthier versions of their favorite desserts. And for those following a strict low-carb diet, it’s a lifesaver when cravings strike.
Conclusion: Indulge in Decadence Without the Guilt
Brazo de Reina proves that you don’t have to sacrifice flavor or elegance to enjoy a healthier version of a classic dessert. With its light sponge cake, creamy filling, and endless customization possibilities, this cake is a must-try for anyone on a keto, paleo, or gluten-free journey.
Ready to give it a try? Gather your ingredients, follow our step-by-step guide, and savor the joy of homemade goodness. Whether you’re enjoying it as a dessert staple, snack, or party centerpiece, Brazo de Reina is sure to become a favorite in your repertoire.
Print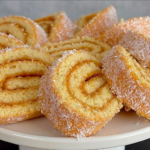
Brazo de Reina: A Low-Carb, Keto-Friendly Twist on a Classic Swiss Roll Cake
Ingredients